Expanding & Scrolling IM Letters - Tutorial 16
Tables
By LismibaebisCreations
14 October 2014
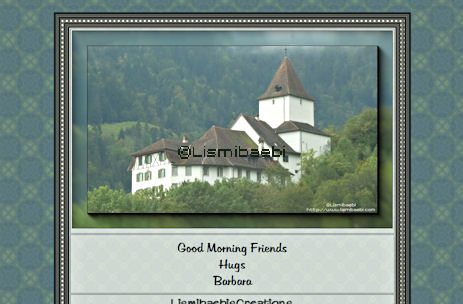
I have used one of my own photographs for this tutorial
Skill Level: Intermediate/Advanced
Needed
Programs
Paint Shop Pro - I used X2
Letter Creator
PeaZip
HTML-Kit
Power Archiver
Image
Image of choice, width greater than height
Plugin
Simple, available here
AAA Frame, available here
Code
Table_LBOct2014.txt, available here
Performance Notes
This tutorial is in 7 parts:
- Preparation
- Main Image
- Background 1 (for LC)
- Background 2 (Text Background)
- Background 3
- Change Coding
- Make new .imf letter
The settings for different Tools and Effects will stay the same throughout the tutorial, unless new setting instructions are given
Don't forget to save your work often
|
Click on the arrow and drag it to mark the progress on this page.
|
Preparation
1) Download and install filter if necessary
(If you install filters you need to restart PSP afterwards)
2) Start > Documents
3) Open your Scrolling Letters Folder
4) Make a folder for your new letter
Save all the images and files you will create to this folder
5) Download, unzip and save Table_LBOct2014.txt to your Lesson Folder
Main Image
6) File > Open
Open image of choice
7) Window > Duplicate (Shift + D)
Close original
8) Image > Resize
Resample using = Bicubic
Lock aspect ratio = Checked
Resize all layers = Checked
Resolution = 72.000 Pixels / Inch
Width = 670 Pixels
Height = Will adjust itself
9) Adjust > Sharpness > Unsharp Mask
Radius = 2.00, Strength = 10
Clipping = 5
Luminance only = Not checked
10) Dropper Tool (E)
Left click in image to choose a light Foreground color
Right click in image to choose a dark Background color
11) Window > Duplicate (Shift + D)
Minimize one copy
12) Edit > Copy
13) Image > Add Borders
Symmetric = Checked
Size in pixels = 35
Color = Any color not in image
14) Magic Wand Tool
Mode = Replace
Match mode = RGB Value
Tolerance = 0
Use all layers = Not checked
Contiguous = Checked
Feather = 0
Anti-alias = Checked
Outside
15) Select new border
16) Edit > Paste Into Selection
17) Selections > Select None
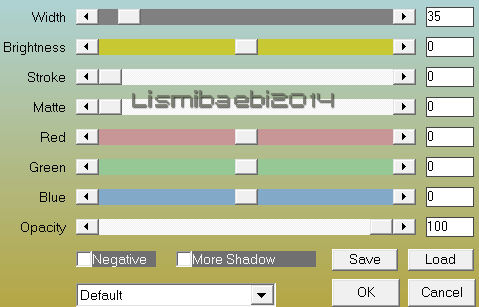
18) Effects > Plugins > AAA Frames > Foto Frame
Width = 35, Brightness = 0
Stroke = 0, Matte
Red = 0, Green = 0, Blue = 0
Opacity = 100 %
Negative = Not checked, More Shadow = Not checked
Default = Checked
19) Layers > New Raster Layer
20) Add Watermark(s)
21) File > Export > JPEG Optimizer
Settings:
Set compression value to = 20 - 30
Chroma subsampling = YCbCr 1x1 1x1 1x1 (None)
Save Exif data = Not checked
Background 1 (for LC)
22) Activate the second copy of the image
Crop Tool (R)
Width = 100, Height = 100
Units = Pixels

23) Click on the middle of the square, hold down with left-click mouse and move to area of choice for background.
Release mouse-left click briefly and double click to crop
24) Effects > Plugins > Simple > Pizza Slice Mirror
25) Effects > Image Effects > Seamless Tiling
Default
26) File > Export > JPEG Optimizer
File name = bg1.jpg
27) Window > Duplicate
Background 2 (Text Background)
28) Image > Resize
Width = 50 Pixels
Height = 50
29) Layers > New Raster Layer
30) Flood Fill Tool (F)
Match mode = None
Sample merged = Checked
Blend mode = Normal
Opacity = 100
31) Left click to flood fill new Layer with Foreground Color
32) Layers Palette
Reduce opacity of layer to 73
33) File > Export > JPEG Optimizer
File name = bg2.jpg
Background 3
34) File > New
Width = 10 Pixels
Height = 10
Resolution = 72.000 Pixels / Inch
Raster Background = Checked
Transparent = Checked
35) Flood Fill Tool
Right click to flood fill with Background Color
36) Layers > New Raster Layer
37) Paint Brush Tool (B)
(Default)
But:
Change Size = 6
Left click once
38) Effects > Edge Effects > Enhance
39) File > Script > CenterLayer.PspScript
40) File > Export > JPEG Optimizer
File name = bg3.jpg
Change Coding
41) Make your LC file according to instructions in Lesson 5, using bg1.jpg as your background
42) Extract the files according to instructions in Lesson Lesson 5
43) HTML-Kit:
File > Open Flavor.htm
44) Delete all code starting with
the first 
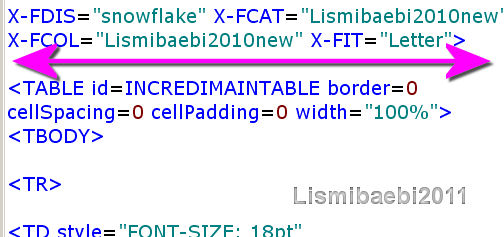
Leave the code above the pink line (yours will look different to mine) intact
45) Open the Table_LBOct2014.txt code
46) Edit > Select All
47) Edit > Copy
48) Again in HTML-Kit:
Edit > Paste
(into the area you deleted)
49) Look for:
borderColor="#005900" and change 005900 to a color of your liking
50) Look for:
bgColor="#a60000" and change a60000 to a color of your liking
51) Look for:
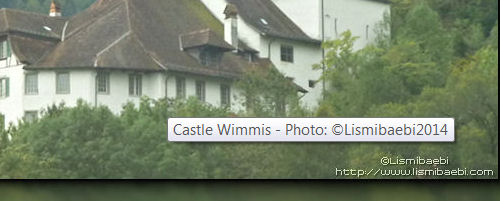
img src="...image name..." width="740" height="450" border="0" alt=""
- Change ...image name... to the name of your main image
- Change 740 to the width of your main image
- Change 450 to the height of your main image
- Optional: Add description and/or © to the alt tag. If you add any text in the alt tag, it will then appear when somebody moves the mouse over the main image. My alt tag for this lesson is:

and looks like this in the letter:
52) Change the names of bg1.jpg, bg2.jpg and bg3.jpg if you have named your backgrounds differently.
53) Look for:
font-size:18pt; if want to change the font size.
54) At the very top of the code:
- Adjust text color (COLOR, text and SIGCOLOR)
- Adjust the link color (link, vLink, aLink)
- Adjust email text background color (bgColor)
55) Footer Code:
Personalize and adjust the code
You can use the footer code from the scrolling or expanding codes if you prefer
Make new .imf Letter
56) Make new .imf file according to instructions in Lesson 9
Make sure that you have all backgrounds and the main image included
If you have any questions, please email Lismibaebi at gmail.com.
|