Poor me - Twirled and Warped SB Tutorial

By LismibaebisCreations
24 January 2012
Revised 18 January 2017
Tutorial image: ©John Vass
Used with written Permission
Skill Level: Advanced Beginners & Adventurous Others
Knowledge of using Filters is necessary
(or learn how to get started with my ABC Tutorials)
This tutorial is my own creation; any resemblance to another tutorial is purely coincidental
Program shortcuts will be given in parentheses
Needed
Paint Shop Pro - I used X2
(Tutorial will work with other versions)
Free 30 day trial from Corel, available here
Image
Tube or mist of choice
(height should be greater than width)
Filters
FM Blend Emboss, available here
Simple Filters, available here
Performance Notes
This tutorial is in 3 parts:
- Preparation
- Pattern
- Background
The settings for different Tools and Effects will stay the same throughout the tutorial, unless new setting instructions are given
Don't forget to save your work often
|
Click on the arrow and drag it to mark the progress on this page.
|
Preparation
1) Download and install filters if necessary
(If you install filters you need to restart PSP afterwards)
2) File > Open
Open image of choice
3) Window > Duplicate (Shift + D)
Close original
4) Image > Resize
Settings:
Resample using = Bicubic
Lock aspect ratio = Checked
Resize all layers = Checked
Resolution = 72.000 Pixels / Inch
Height = 400 Pixels
Width = Will self adjust
5) Adjust > Sharpness > Unsharp Mask
Settings:
Radius = 1.00
Strength = 47
Clipping = 5
Luminance only = Checked
(Or a setting of your liking)
6) Dropper Tool (E)
Left click to choose a
light Foreground color
(I chose #e1edc3)
7) Window > Duplicate
Minimize copy
Pattern
8) Image > Resize
Settings:
Lock aspect ratio = Not checked
Height = 225 Pixels
Width = 225
9) Layers > New Raster Layer
10) Flood Fill Tool (F)
Settings:
Match mode = None
Use all layers = Not checked
Blend mode = Normal
Opacity = 100
11) Left click to flood fill with Foreground Color
12) Layers > Arrange > Send to Bottom
13) Layers > Merge > Merge Visible
14) Effects > Distortion Effect > Twirl
Settings:
Degrees = 450
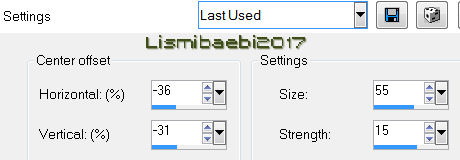
15) Effects > Distortion Effect > Warp
Settings:
Horizontal (%) = -36 (Minus)
Vertical (%) = -31 (Minus)
Size = 55, Strength = 15
16) Effects > Distortion Effect > Wave
Settings:
Horizontal displacement:
Amplitude = 10
Wavelength = 20
Vertical displacement:
Amplitude = 10
Wavelength = 20
Edge mode = Repeat
17) Effects > Plugins > Simple > Top Left Mirror
18) Effects > Plugins > Simple > Centre Tile
19) Effects > Plugins > FM Tile Tools > Blend Emboss
Settings: Default
Horiz. Offset = -1.000
Vert. Offset = -1.000
Intensity = .250
Gray Level = 64
Red Blend = 0.938
Green Blend = 0.938
Blue Blend = 0.938
Edge Wrap = Checked
20) Effects > Image Effects > Seamless Tiling
Settings:
Default
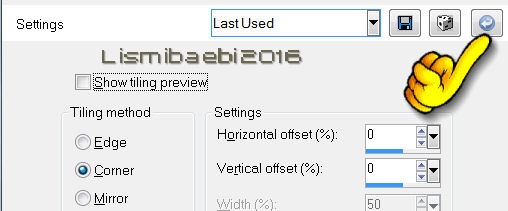
If you click on the arrow indicated by the hand, PSP will set it to default
This will be called Pattern for the rest of the tutorial
21) Materials Palette
Change Background to Pattern
Settings:
Pattern: Pattern you just created
Angle = 0, Scale = 100
Texture = Not checked
Background
22) Activate your minimized copy
Image > Canvas Size
Settings:
Lock aspect ratio = Not Checked
Width = 2000 Pixels (or width of choice)
Height = 450
Placement = Left Middle Arrow
Left = 10
23) Layers > New Raster Layer
24) Layers > Arrange > Send to Bottom
25) Flood Fill Tool
Right click to flood fill with Pattern
26) Layers > New Raster Layer
27) Flood Fill Tool
Left click to flood fill new layer with Foreground Color
28) Layers Palette
Change Blend Mode to Soft Light
29) Layers > New Raster Layer
30) Flood Fill Tool
Left click to flood fill new layer with Foreground Color
31) Layers Palette
Reduce opacity to 90
(or a setting of your liking)
32) Layers Palette
Activate Tube/misted image layer
33) Effects > 3D Effects > Drop Shadow
Settings:
Vertical = 2, Horizontal = 2
Opacity = 40, Blur = 25.00
Color = Black
Shadow on new layer = Not checked
(Or a setting of your liking - if using a mist you might wish to leave this step out)
34) Layers > New Raster Layer
35) Add Watermark(s)
36) File > Export > JPEG Optimizer
Settings:
Set Compression value to = 20 - 30
Chroma subsampling = YCbCr 1x1 1x1 1x1 (None)
Save Exif data = Not checked
You are done!
Now you can assemble the stationery in LC or OE/Windows Mail or Wikmail.
I hope that you enjoyed doing this tutorial. If you have any questions, please email me:
Lismibaebi at gmail.com
I would love to see what you create with my tutorial.
Please link the tutorial to this page.
A special "Thank you" goes to the United Tut Testers who helped me with the original version of the tutorial in 2012.

Proud member of

|
and
|

|

Back to top
|